As you reach the end of your nursing program, you’re probably asking yourself what’s next. Well, after all you’ve accomplished, now it’s time to register for the NCLEX!
NCLEX registration can seem like a daunting task, and it’s common to have plenty of questions about it. In this post, we’ll demystify how to register for the NCLEX by breaking down each step into digestible parts, ensuring you have all the information you’ll need to proceed with confidence.
Whether you’re just starting to look into what you’ll need for NCLEX registration or already looking at NCLEX exam dates, this guide will provide a clear path forward. Let’s explore the essential steps and tips to simplify the process, helping you move one step closer to achieving your goal of becoming a real-deal RN. 💙
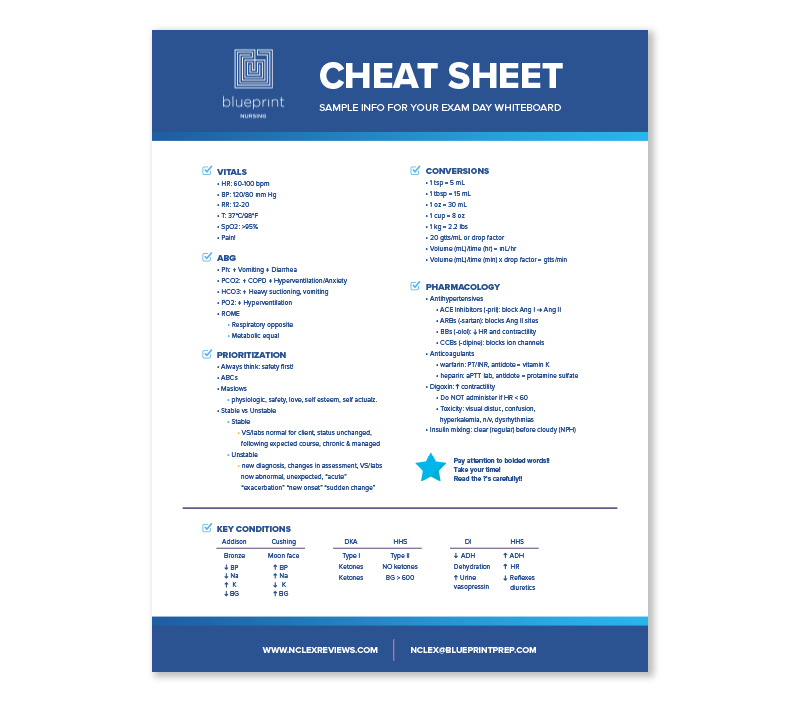
Approaching the NCLEX and need a bit more study time? We’ve got you covered! Grab the FREE NCLEX Cheat Sheet with key calculations, conversions, and concepts you’ll need for the exam. 🤩
5 Steps to NCLEX Registration
1. Meet all requirements prior to NCLEX registration.
First and foremost, you must meet the requirements held by your state’s nursing regulatory body (NRB). This step is crucial as the NRB will connect with Pearson VUE (the group that runs the NCLEX) and provide you with the eligibility to test. You can go to the National Council of State Boards of Nursing (NCSBN) website to see your state requirements.
If you’re still in nursing school, it’s likely your professors will help you through this process, as you’ll need to pass your final exams and graduate from your program to become eligible. Sometimes it can take a month or more to process the documents required by your state, so it’s best to contact your NRB as soon as possible. That way, when you graduate, they’ll already have the documents needed!
2. Go to the Pearson VUE website.
Now it’s time for the easy part! To register for the NCLEX, you’ll need to go to the Pearson VUE website and create an account. There are multiple ways you can sign up for the NCLEX, but Pearson VUE recommends registering online to avoid high call volumes. The website will show you how to create an account.
3. Pay the NCLEX registration fees.
Now you may be wondering, how much does the NCLEX really cost? If you’re looking to take it in the United States, it costs $200 USD. In Canada, the fee is $360 CAD. The website will ask you to pay with VISA, Mastercard, or American Express via credit, debit, or prepaid cards.
4. Check out NCLEX exam dates.
Once you’ve created your account and paid for NCLEX registration, it’s time to schedule your exam! Following graduation, you should receive an email with your authorization to test number (ATT). It’s so important that you sign up for an exam date before your ATT expires.
The amount of time you have to schedule your exam varies by state. Some states may allow more time than others, so be sure to read your email thoroughly and note when your ATT expires.
For first-time test-takers, you’ll be offered an appointment time 30 days after your request. For repeat test takers, you’ll be offered an appointment time 45 days after your request. Keep in mind, you can schedule later than 30 or 45 days if you want. However, if you wait too long to schedule your exam, they may not have a spot available before your ATT expires.
5. After you register for the NCLEX, look for a confirmation email.
Once you’ve set a date to take your NCLEX, you should receive a confirmation email from Pearson VUE. If you don’t get an email or any information is incorrect, contact Pearson VUE candidate services.
If any extenuating circumstances occur and you need to reschedule your exam, you must call or go online at least one full business day before your exam date. If your exam is scheduled on a Saturday, Sunday, or Monday, you must call on Friday and at least 24 hours before your exam. This rule also applies if your testing center needs to be changed.
We don’t recommend missing an appointment to test without notice. Without proper notice, you’ll be charged another exam fee and your authorization to test will be invalidated. It’ll also be written up as a case report that can be seen by the NRB. So, do your best to avoid missing your appointment!
Need more time to prep? Check out these FREE NCLEX study resources!
So, those are the five steps—you’ve registered for the NCLEX and scheduled your test date. Now what? It’s study time!
Blueprint Nursing has many ways to help you prepare for your NCLEX. Explore our FREE NCLEX resources from TikTok to cheat sheets, webinars, and more! 💙
And for even more prep help, check out these other blog posts from real-deal RNs!